

To change your presence status in Outlook 365, click on your profile picture and select the desired status. This change can reflect whether you are available, busy, or away.
Microsoft Outlook 365 offers a comprehensive way to manage your professional communications and scheduling. The ability to change your presence status is a key feature that allows users to communicate their availability to colleagues efficiently. Whether you’re stepping out for a quick break or diving deep into a project with a “Do Not Disturb,” Outlook’s presence statuses help manage expectations and minimize workflow interruptions.
With the integration of Microsoft Teams within Outlook, syncing your status across platforms has never been easier, ensuring that your network is always informed of your availability. This simple yet powerful tool is essential for fostering productive work environments and maintaining professional etiquette in digital communication.
Table of Contents
Introduction To Presence Status In Outlook 365
Understanding Presence Status in Outlook 365 means recognizing how the software displays your availability. With features that signal whether you’re free, busy, or away, grasping this concept is key to efficient communication in today’s online work environment.
The Role Of Presence Status
Presence Status acts as a personal assistant. It informs others of your availability. Think of it like a digital “Do Not Disturb” sign or a welcome mat inviting conversation.
Here’s why Presence Status is vital:
- It streamlines communication by showing your contacts when it’s a good time to reach out.
- Schedules are respected, thanks to clear indicators of your current focus.
- Avoids unnecessary disruptions during important tasks or meetings.
- Enhances team synchronization by aligning actions with real-time availability.
Benefits Of Accurate Presence Indicators
Setting an accurate Presence Status keeps workflows smooth. Your team gains important insights without having to ask, saving time and avoiding interruptions.
Credit: techcommunity.microsoft.com
Starting Out With Outlook 365
Starting Out with Outlook 365 is easy. Manage emails, calendars, and contacts in one place. Stay connected and organized. Learn to customize your presence status. Let others know when you are available, busy, or away. Follow these steps to ensure a smooth start with Outlook 365.
Accessing Your Account
First, sign in to Outlook 365. Open your web browser. Go to the Outlook login page. Enter your email address and password. Your inbox will welcome you. Here’s a quick list to access your account efficiently:
- Visit the Outlook website.
- Type in your email address.
- Enter your password.
- Click Sign in.
Navigating The Interface
Once inside, explore the layout. Look at the left sidebar. Find mail, calendar, and people icons. The top ribbon has different tools and options. Check your emails. Plan your week. Connect with contacts. Use these tips to navigate smoothly:
- Explore the sidebar for main features.
- Use the search bar to find specific emails.
- Check the calendar to view upcoming events.
- Adjust your status from the profile picture area.
Outlook 365 makes communication easy. Your presence status tells your network your availability. Ready to set it up? Stay tuned for the next steps.
Changing Presence Status
Mastering the art of changing your presence status in Outlook 365 is key to managing your professional communication effectively. Whether you’re stepping away for a quick coffee break or buckling down on a focused work session, letting your colleagues know your availability can enhance productivity across your team. Let’s dive into the simple steps to take control of your presence status.
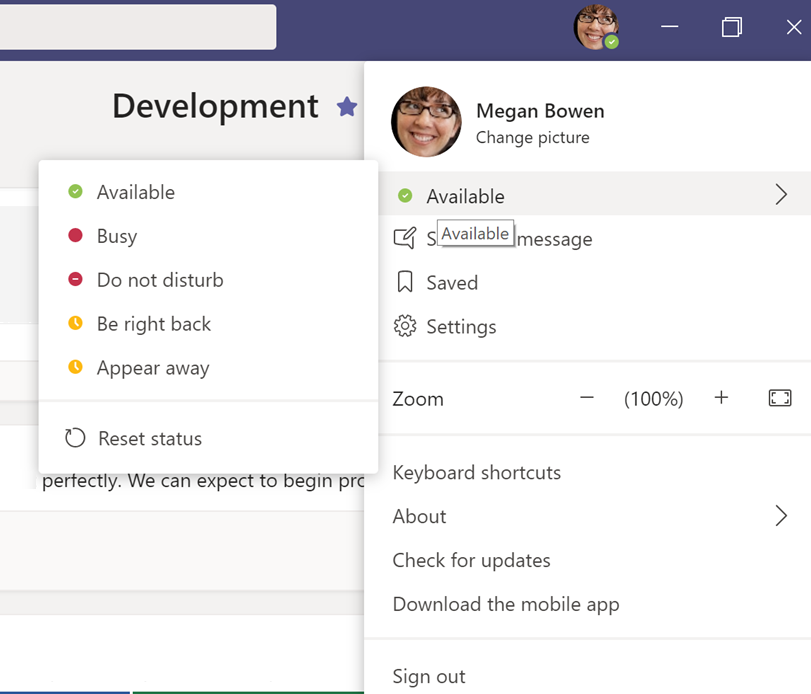
Using The Status Menu
To adjust your presence status:
- Open Outlook 365.
- Find your profile picture or initials at the top corner.
- Click on the icon to reveal the status menu.
- Select from options like Available, Busy, Do Not Disturb, or Be Right Back.
Your new status will be visible to contacts immediately, helping them understand when to reach out.
Setting Custom Messages
For a more personalized touch:
- Navigate to your profile picture in Outlook 365.
- Click to open the options.
- Choose ‘Set Your Status Message.’
- Type in a message that will show up next to your name.
- Decide how long this message should display and click ‘Done.’
Custom messages are great for sharing specific details, like return times or work focus.
Remember, a clear presence status shields your time and respects others’ schedules. Use these methods to inform your network and manage your day more efficiently!
Advanced Presence Features
Advanced Presence Features in Outlook 365 add a layer of sophistication to how you manage your visibility among contacts. They allow greater control and automation, indicating your availability with precision. Let’s dive into how these features can streamline your experience with presence status in Outlook 365.
Automated Status Updates
Outlook 365 takes the hassle out of manual updates for your presence status. With Automated Status Updates, the system uses your activity to set your availability. For example, if you are inactive for a period, Outlook will automatically show you as Away. Engage in a task, and it reflects as Busy. This offers a real-time glimpse into your work rhythm, making it easier for colleagues to know when to reach out.
Integration With Calendar
The Integration with Calendar feature synchronizes your presence status with your calendar events. Are you in a meeting? Your status will show as In a Meeting. Have a personal appointment? It can read Out of Office. This seamless link ensures others see your status aligning with your scheduled commitments, fostering better communication and reducing interruptions.
| Calendar Event | Corresponding Status |
|---|---|
| Meeting | In a Meeting |
| Appointment | Out of Office |
| Free Time | Available |
These dynamics within the Automated Status Updates and Calendar Integration make for a dynamic and intuitive way of sharing your presence. Embracing these advancements can lead to improved work efficiency and better time management within your team.
Troubleshooting Common Issues
When you’re trying to show your colleagues whether you’re available or out of the office, Outlook 365 makes it simple with its presence status feature. But what if your status won’t update correctly? We’ll walk through some common issues and how to fix them, so you can ensure your presence status reflects your actual availability.
Status Not Updating
It’s frustrating when Outlook doesn’t show the right status. Let’s tackle common reasons and solutions:
- Check if Outlook is connected to the server.
- Restart Outlook to refresh the connection.
- Verify if the Automatic Replies feature is turned on.
If these steps don’t work, it’s time to dive deeper. A full system reboot can clear lingering issues. Try signing out and back into your account as well.
Conflicts With Third-party Applications
If your status won’t update, another application might be to blame.
Start with these steps:
- Identify recent software installations.
- Disable any add-ins in Outlook that might interfere.
- Use Outlook in Safe Mode to tests without add-ins.
To open Outlook in Safe Mode, hold the Ctrl key and click on the Outlook shortcut. Confirm you want to start in Safe Mode. This method helps identify conflicting software.
After identifying the troublesome app, update it or contact its support team.
Credit: subscription.packtpub.com
Best Practices For Presence Status
Managing your presence status in Outlook 365 is crucial for you. It helps others know your availability. It’s all about clear communication. To ensure others can see if you’re free, follow these best practices. They keep your status accurate and helpful.
Regular Updates For Accuracy
Keeping your presence status up-to-date is a must. It avoids confusion. Check your status daily. Correct it if needed. Accurate statuses mean better workflow. Use these steps:
- Start Outlook 365.
- Find your profile picture.
- Select your current status.
- Choose the right one from the list.
Make it a habit. A regular morning check ensures a smooth day. Everyone stays informed. Productivity stays high.
Communicating Availability Effectively
An effective status conveys your availability. Be clear and direct. Use ‘Available’ when at your desk. Choose ‘Busy’ for focus times. If in meetings, ‘Do Not Disturb’ works best. See below:
| Status | When to Use |
|---|---|
| Available | Free to chat or meet |
| Busy | Working, but can be interrupted |
| Do Not Disturb | Cannot be interrupted |
| Away | Not at your desk right now |
| Appear Offline | Need to focus, appear unavailable |
Remember to match your Outlook calendar. Your status should reflect your actual activity. It keeps everyone on the same page. Clear statuses reduce unnecessary interruptions.
Credit: softkeys.uk
Frequently Asked Questions For How To Change Presence Status In Outlook 365
How Do I Set My Outlook Presence Status?
To set your presence status in Outlook 365, open the app and find the profile picture at the top. Click on your profile photo to reveal a dropdown menu. From there, select your desired status: Available, Busy, Do Not Disturb, or Away.
Can Presence Status In Outlook Be Automated?
Yes, your presence status in Outlook 365 can be automated. It syncs with your calendar by default, showing you as ‘Busy’ during scheduled meetings. Outlook can also adjust your status based on your computer’s activity.
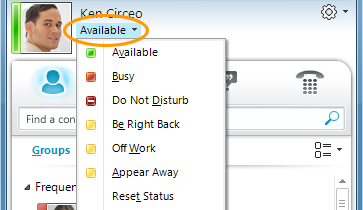
What Presence Options Are Available In Outlook?
Outlook offers several presence options such as Available, Busy, Do Not Disturb, Be Right Back, Off Work, and Appear Away. Each status communicates your availability to colleagues.
How To Change My Status To ‘offline’ In Outlook?
To appear ‘Offline’ in Outlook 365, click on your profile icon at the top of the app. From the dropdown, select the ‘Sign out’ option. This will show your status as ‘Offline’ to others.
Conclusion
Mastering your Outlook 365 presence status gives you control over your workday communication. By following the steps outlined, you can effortlessly signal your availability to colleagues. It streamlines your professional interactions and enhances productivity. So, tweak your status to suit your schedule and watch your office communications transform seamlessly.


